
Getting Started
Basic Navigation
How do I navigate through the book?
How does screen resolution affect navigation?
Can I change the screen resolution?
Can I change the size and shape of the BookOnCD window?
Videos, Animations, and Software Tours
How do I control media elements?
Can I adjust the volume?
Glossary and Definitions
Can I get a definition of bold words?
How does the Glossary work?
What about Wikipedia links?
How do I get back to the BookOnCD?
Annotations
What are annotations?
How do I get them?
What if I don’t have a Tracking file?
QuickChecks and Skill Sets
What activities on the BookOnCD are computer scored?
How should I use computer-scored activities?
How do I enter my answers?
How do I check my answers?
Can I go back for a retake?
Tracking File
What is a Tracking file?
Should I create a Tracking file?
How do I create a Tracking file?
How do I view or print the contents of my Tracking file?
How do I submit scores from my Tracking file?
Are scores erased from my Tracking file when they are sent?
Does the computer remember the location of my Tracking file?
What if I start the BookOnCD and it isn’t pointing to my Tracking file?
How do I select a different Tracking file?
Can I temporarily disable tracking?
How do I back up my Tracking file?
Can I move my Tracking file to a different storage location?
Can I delete a Tracking file?
Web Links
What are the Web Links menu options?
Help
Where can I get technical support?
Basic Navigation
How do I navigate through the book?
Go to a Chapter. Use the Contents menu to jump to the beginning of any chapter.
Go to a section. On the first page of a chapter, you can click on the contents to jump to chapter FAQs, end-of-chapter review activities, and Projects associated with the chapter.
Next or Previous Page. Use the Next and Back buttons to view the next page or the previous page in the book. If you are viewing page 20, for example, and you click the Next button, you will go to page 21. If you then click the Back button, you will go back to page 20.
Any page. The Go To Page control allows you to enter a page number, jump to it, and then return to the page you were viewing. For example, suppose you are viewing page 4 but want to check something on page 33. Refer to the screenshot below to see how to do this.

Up or down a page. Use the scroll bar or the wheel on your mouse to move up or down any page.
Navigation shortcuts:
· To get to a QuickCheck or Skill Set, such as the ones at the end of Chapter 4, use the Contents menu to jump to the next chapter (in this case chapter 5) then use the Back button to back up one page.
How does screen resolution affect navigation?
Screen resolution is measured by the number of pixels across and down. To use the BookOnCD, your computer’s screen resolution must be set to 800 x 600 or higher. At higher resolutions, you can see more of the page, but the text appears smaller than at lower resolutions. At very high resolutions, you can see an entire page without scrolling, but not all monitors support that high resolution. When using the BookOnCD, you should use the highest resolution that allows you to comfortably read the text on the screen.
Can I change the screen resolution?
You can use the Windows Control Panel to change the screen resolution. Do not change the resolution to 640 x 480 because your BookOnCD requires the resolution to be at least 800 x 600 to run.
To change the screen resolution:
1. Click the Start button and then click Control Panel.
2. From the Control Panel, double-click Display. In Windows XP, first click Appearance and Themes and then click Display.
3. Click the Settings tab.
4. Use the slider bar to select a resolution.
5. Click OK.
Can I change the size and shape of the BookOnCD window?
You can change the size, shape, and position of the BookOnCD window. The configuration of the window when you start the BookOnCD provides you with the optimal view that is just wide enough to display a page and as tall as your monitor allows.
Maximize. You can maximize the BookOnCD window by clicking the Maximize button in the upper right corner of the BookOnCD window. When maximized, the page remains centered on the screen and white space is added on the right and left to fill the screen.
Restore. If you prefer not to work with a maximized window, use the Restore button to shrink the window to its previous size.
Change shape. You can make the window wider or narrower, taller or shorter by dragging the edges of the window. The BookOnCD will not allow you to make the book narrower than a page, however, so that you don’t have to scroll horizontally.
Change position. You can move the window anywhere on the screen by dragging its title bar.
Two monitors. If you have two monitors connected to your computer, you can drag the BookOnCD to the second monitor.
Videos, Animations, and Software Tours
How do I control media elements?
Start. Click the Click to Start icon to start the video, animation, or software tour.
Stop. To stop a media element, click the Exit button or the Close button in the upper right-hand corner of the media window.
Control buttons. Some media elements, such as software tours, appear in a window that include Exit, Rewind, Pause, and Play buttons. You can use these buttons to control the media.
Can I adjust the volume?
Most media elements have a soundtrack. The soundtrack’s volume is controlled by Windows. To adjust the volume, right-click the speaker icon in the lower-right corner of your on-screen desktop. If the speaker icon does not appear there, click the Start button, click Control Panel, and then double-click Sounds and Audio Devices to access the volume control.
Glossary and Definitions
Can I get a definition of bold words?
Click any bold word in the text to see its definition. To close the definition window, click anywhere on the definition window.
How does the Glossary work?
If you encounter a term in the text you don’t know or remember, click the Glossary button on the BookOnCD toolbar. When the Glossary window opens, type the first few characters of the word or scroll down the list to find the term. Click the term. Its definition, as used in the book, appears.
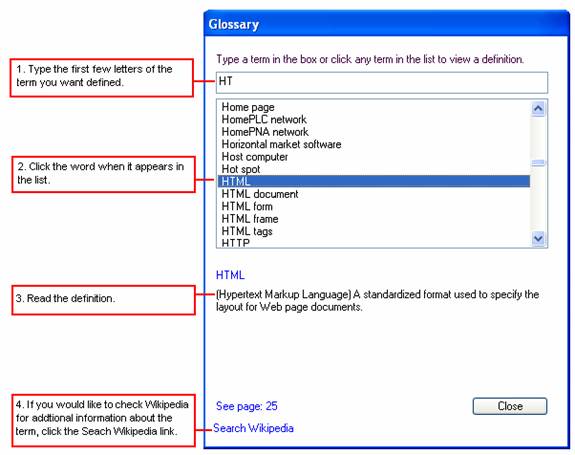
What about Wikipedia links?
To get additional information about a term, you can click the Search Wikipedia link. Your browser opens and automatically links to Wikipedia and searches for the term. Some terms from your book, might not be listed in Wikipedia and you’ll see a message “We don’t have an article called...” Some terms have multiple definitions and you might have to select an option from the Wikipedia screen to narrow your search.
Wikipedia is a free encyclopedia that contains thousands of definitions and articles on a wide variety of subjects. A community of users, many who are subject matter experts, maintains the articles. Wikipedia community members review most of the material for errors; however, some errors escape detection. Occasionally a rogue contributor deliberately posts false or misleading information. As with any information resource, trust the information from Wikipedia only if you can verify it by cross-checking other sources.
How do I get back to the BookOnCD?
When viewing Wikipedia entries, you can get back to the BookOnCD by closing the browser window. Close the Glossary window when you’ve finished looking up terms.
Annotations
What are annotations?
An annotation is supplementary information that relates to a page in your textbook and is supplied by your instructor. An annotation for page 86, for example, might offer additional information on the difference between HD-DVDs and Blu-ray DVDs.
When you use the BookOnCD, an Annotation button appears on the toolbar when you view the page that contains an annotation.
How do I get them?
When shipped, the BookOnCD contains no annotations—they have to be supplied by your instructor, who posts them on the Web. Your instructor might post all the annotations for your class at the beginning of the course, or might post them as the course progresses. Your instructor should tell the class when annotations are posted.
When you send in Tracking data, links to your instructor’s annotations are downloaded and saved along with your Tracking file. You won’t see the list of links when you view your Tracking Report, however, but when you view a page that has an annotation, you will see the Annotation button on the toolbar.
To view an annotation, click the Annotations button. Your browser will automatically open, connect to the annotation link for the page you are viewing, and show you the annotation. To return to the BookOnCD, close the browser window.
What if I don’t have a Tracking file?
You need to have a Tracking file to get annotations. The file contains your instructor information and provides a place to store the annotation links. Refer to the Tracking File section of Getting Started to find out how to create one. If you don’t want to track all your activities, but you still want to get annotations, simply create a Tracking file, take one QuickCheck, and send the same data to your instructor anytime new annotations are posted.
QuickChecks and Skill Sets
What activities on the BookOnCD are computer scored?
When using the BookOnCD, your computer scores the following activities:
· QuickChecks at the end of each section
How should I use computer-scored activities?
Computer-scored activities can help you check your comprehension of the material you’ve read.
· When you complete a chapter, take the QuickCheck and Skill Set quizzes.
· Repeat these QuickChecks and Skill Sets as a quick refresher before a test.
Your instructor might want to collect your scores. Refer to the Tracking File section to learn more about saving your scores and submitting them to your instructor.
How do I enter my answers?
When you begin a computer-scored activity, it is a good idea to position the BookOnCD page so that you can see all the questions and the Check Answers icon or Check It! Button at the same time. Depending on your computer screen resolution, you might not be able to do this for all activities, If you cannot position the page optimally, don’t worry, you can scroll up and down as necessary to view the questions, enter answers, and see your score.
Enter and edit answers. To enter your answers, click the text-entry box within the question and then type your answer. Capitalization is ignored when your answers are checked, so you can use uppercase or lowercase. You must, however, spell your answer correctly. You can use editing keys such as Backspace, Delete, and the right and left arrow keys to edit your answers as your type.
Go to next question. To get to the next question, you can press the Tab key or just click the next answer box.
Back up. You can backup to previous questions anytime before clicking Check Answers or Check It! by clicking the text-entry box for any question.

How do I check my answers?
After you’ve answered all the questions, click the Check Answers icon or the Check It! button. Your computer will check the first answer and tell you if your answer is correct or incorrect.
Check next answer. Click the OK button for your results from the next question.
Move box. If the Correct/Incorrect box hides the question or your answer, you can drag the box’s title bar to a different location.
Finishing. You must finish checking answers before you can move to a different page in the BookOnCD.
Can I go back for a retake?
Once you move off a page, your answers are cleared and you can try again. If you have Tracking turned on, scores from all your attempts will be saved.
Tracking File
What is a Tracking file?
A Tracking file stores a running list of your scores from the computer-scored activities you work with on the BookOnCD. Your Tracking file can be stored on a floppy disk, your computer’s hard disk, a USB Flash drive, or a network drive where you have permission to store files. Once you start tracking your scores, you can view a Tracking Report at any time. Your instructor might ask you to submit your Tracking data in order to monitor your progress in the course.
Should I create a Tracking file?
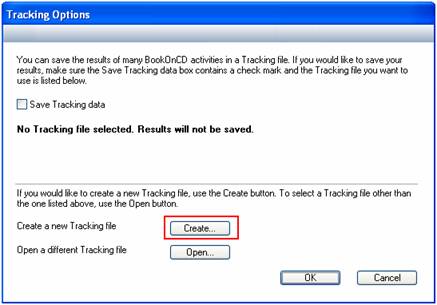
If you want to work with computer-scored activities, but you don’t want a record of your scores, you don’t need to set up a Tracking file and you can simply make sure the box next to Save Tracking data is empty, as shown below.

If you want to keep track of your results on computer-scored activities or if your instructor wants to monitor your progress with a Tracking Report, you should set up and use a Tracking file. Read the next set of FAQs for information about creating and working with Tracking files.
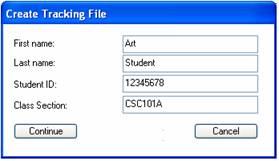
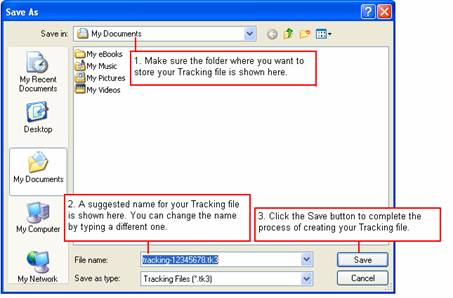
How do I create a Tracking file?
1. Make sure your BookOnCD is open.
2. Click File on the BookOnCD menu bar, then click Change Tracking Options.
3. When the Tracking Options dialog box appears, click the Create button as shown below, then click OK.
4. When the Create Tracking File dialog box appears (see below), enter the requested data, then click the Continue button.
5. Use the Save As dialog box to specify the location and name for your Tracking file as shown below.
6. Back at the Tracking Options dialog box, make sure there is a check mark in the box labeled Save Tracking data, then click the OK button. Now your Tracking file is ready to receive your scores.
How do I view or print the contents of my Tracking file?
View. To view your Tracking Report click File on the BookOnCD menu bar, then click View Tracking Report. The BookOnCD opens a local version of your browser to display your Tracking Report.
Print. You can use the Print option from the browser’s File menu to print your report.
How do I submit scores from my Tracking file?
You can submit scores from your Tracking file in two ways: using e-mail or using WebTrack. Check with your instructor to find out which method you should use.
E-mail. Use the View Tracking Report option on the File menu to display your Tracking Report, then you can use the Send option from your browser’s File menu to e-mail your report.
WebTrack. You can use the Submit Tracking Data option on the File menu to send your scores to your instructor. The files are sent over an Internet service called WebTrack. Before you begin, make sure you have the following:
· An Internet connection
· Your instructor’s WebTrack address
· Tracking file (If you’ve stored your data on a USB Flash drive, make sure it is connected; if your data is on a floppy disk, make sure it is inserted in the drive.)
To submit scores using WebTrack:
1. Click File on the BookOnCD menu bar, then click Submit Tracking Data.
2. Make sure your instructor’s WebTrack address is correctly displayed in the Tracking Data Destination dialog box, then click the Continue button.
3. Your computer opens a browser window, makes an Internet connection, and contacts the WebTrack server.
4. When the WebTrack screen appears, make sure the information displayed is correct, then click the Submit button.
5. When you see a message that confirms your data has been submitted, you can close the browser window by clicking the red Close button in the upper right-hand corner of the browser window.
Are scores erased from my Tracking file when they are sent?
No. Your scores remain in your Tracking file—only a copy of your Tracking data is sent to your instructor. If your instructor’s computer malfunctions and loses your data, you can resubmit your Tracking file. It is a good idea to back up your Tracking file using the Back Up Tracking File option on the File menu. Then, if your file is damaged or lost, you’ll have a copy.
Does the computer remember the location of my Tracking file?
The BookOnCD writes the name of your tracking file and its location to your user profile. When you use the BookOnCD on your own computer, it automatically finds and opens your Tracking file when you start the BookOnCD. In some cases, when you use a lab computer, your profile might get erased, or another student’s tracking file might be found instead of yours. In labs, we recommend the following:
· Save your data on a removable device, such as a floppy disk or USB Flash drive.
· If you’ve been assigned a personal storage area on a lab network, you can store your Tracking file there, but make sure you write down the location. When you log into a lab computer and start the BookOnCD, you might have to use the Open button on the Tracking Options dialog box to select the Tracking file you want to use.
· When using the BookOnCD in a lab, make sure the Tracking file listed in the Tracking Options dialog box is yours. If it is not, follow the instructions in the FAQ “How do I select a different Tracking file?”
What if I start the BookOnCD and it isn’t pointing to my Tracking file?
In a setting in which multiple people use one computer, such as a school lab, the BookOnCD “remembers” the last-used Tracking file. If you start the BookOnCD and the Tracking Options dialog box lists a Tracking file that is not yours, you can use the Open button to select a different Tracking file. See the next FAQ for detailed steps on this process.
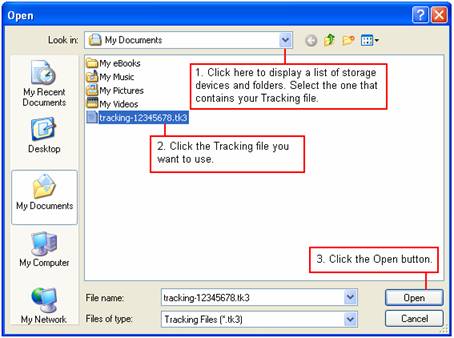
How do I select a different Tracking file?
To select a different Tracking file:
1. Make sure the storage device that contains your Tracking file is connected to your computer. For example, if your Tracking file is stored on a USB Flash drive, make sure you’ve plugged it in.
2. If the Tracking Options dialog box is not open, click the File menu and select Change Tracking Options.
3. From the Tracking Options dialog box, click the Open button.
4. When the Open dialog box appears, click the down-arrow button on the right side of the Look in box.
5. From the list, select the drive and folder that contains your Tracking file.
6. Click the Tracking file you want to use.
7. Click the Open button.
Can I temporarily disable tracking?
The Save Tracking data box, which is located on the Tracking Options dialog box, controls whether or not your results are tracked. To open the Tracking Options dialog box, click File and then click Change Tracking Options.
If you don’t want to track, you can click the Save Tracking data box to remove the check mark. When you want to resume tracking, click the box to place a check mark in it.
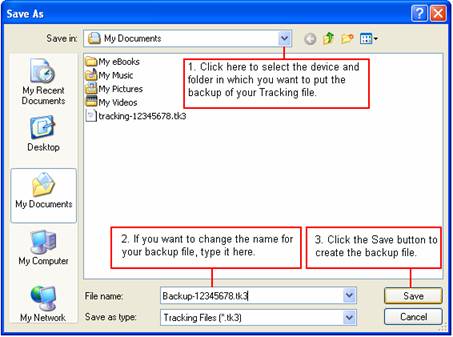
How do I back up my Tracking file?
It is a good idea to have a backup copy of your Tracking file in case you lose the original or it gets damaged. For maximum security, store your backup on a disk or USB Flash drive other than the one that contains your working copy. Make sure you keep your backup up-to-date!
To make a backup of your Tracking File:
1. Click the File menu and select Back Up Tracking File.
2. When you see the Back Up Tracking File message box, click the Continue button.
3. When the Save As dialog box appears, use the Save in box to select the location for your backup. For example, if you want to put your backup on a USB Flash drive that’s designated as E:, select that device from the list.
4. You should change the name of the file. For example, you might want to change the name from Tracking-12345678.tk3 to Backup-12345678.tk3. You should maintain the .tk3 file extension.
5. Click the Save button.
6. A message box displays the name and location of your backup file. You should make a note of it so you can locate it in the future.
7. Click the OK button to complete the process.
Can I move my Tracking file to a different storage location?
You might want to move your Tracking file to a different location. For example, suppose you’ve been using a lab computer and you inadvertently created a Tracking file on the hard disk of a lab computer that will be wiped out when the next student logs in. Before you leave, you can move your Tracking file to a floppy disk or USB Flash drive.
To move your Tracking file:
1. Click File, then click Move Tracking File.
2. When the message box appears, click the Continue button.
3. Double-click the drive and folder to which you want to move your Tracking file. For example, if you want to move it to a USB Flash drive that’s designated as E:, select it from the list.
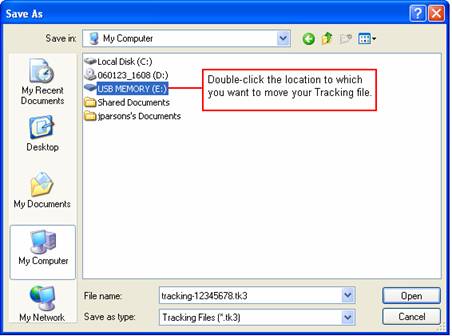
4. When the new location for your tracking file is displayed in the Save in box, click the Save button.
5. A message box will confirm that your file has been moved. Click the OK button.
6. Your Tracking file is now in its new location. The BookOnCD will store this location as the last used Tracking file and will look for it the next time the BookOnCD starts.
Can I delete a Tracking file?
You rarely would need to delete your Tracking file until you’ve completed your course. To delete your Tracking file, find it using My Computer or Windows Explorer, highlight it, and press the Delete key.
Web Links
What are the Web Links menu options?
The BookOnCD menu bar contains a Web Links menu. You can use options on this menu to access technical support. To use the Web Links options, you must have an Internet connection. When you select a Web Links option, your browser opens. You can navigate using your browser as usual. When you are ready to return to the BookOnCD, simply close the browser window.
Help
Where can I get technical support?
Many questions about using the BookOnCD are answered in the Help file you are currently reading. If you run into technical difficulty, you can access online help. To do so, click Help on the menu bar, then select Online Help. If you are not able to access the site through the BookOnCD, you can manually open your browser and connect to:
http://www.mediatechnics.net/products/support/practicalopenoffice.htm